What is WebBench?
Webbench是一个在linux下使用的非常简单的网站压测工具。它使用fork()模拟多个客户端同时访问我们设定的URL,测试网站在压力下工作的性能,最多可以模拟3万个并发连接去测试网站的负载能力。Webbench使用C语言编写, 代码实在太简洁,源码加起来不到600行。
1. 使用方法
1 | sudo make clean |
实例:./webbench -t 10 -c 50 http://www.baidu.com/1
2
3
4
5
6
7five@master:~/github/OpenCCode/WebBench$ ./webbench -t 10 -c 50 http://www.baidu.com/
Webbench - Simple Web Benchmark 1.5
Copyright (c) Radim Kolar 1997-2004, GPL Open Source Software.
Benchmarking: GET http://www.baidu.com/
50 clients, running 10 sec.
Speed=492 pages/min, 918494 bytes/sec.
Requests: 82 susceed, 0 failed.
2. 函数调用关系
main -> build_request -> main -> bench -> benchcore -> main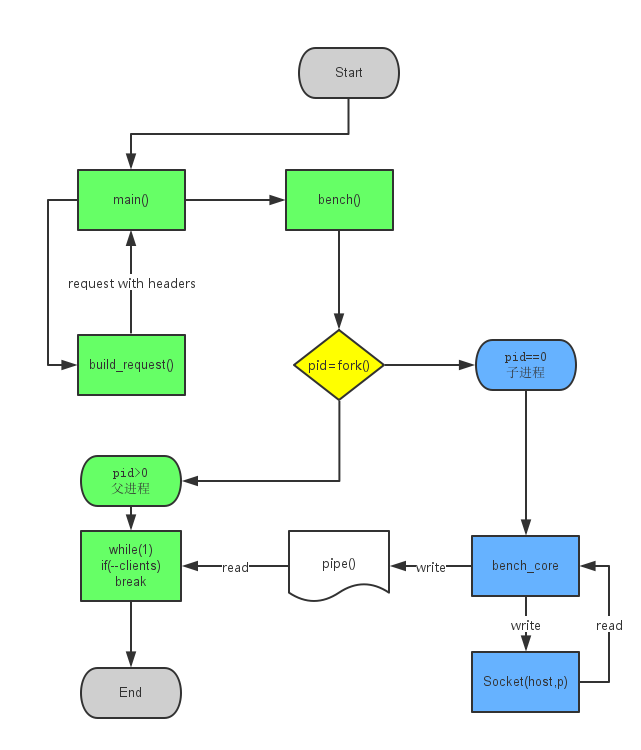
3. main函数部分
3.1 volatile关键词
volatile用法总结:(不希望编译器优化、多任务程序可能随时更改、设计硬件寄存器时)
volatile的使用的场合大致有以下几点:
- 中断服务程序中修改的供其它程序检测的变量需要加volatile;
- 多任务环境下各任务间共享的标志应该加volatile;
- 存储器映射的硬件寄存器通常也要加volatile说明,因为每次对它的读写都可能有不同意义。
参考文献:
3.2 #ifndef 和#if !defined的区别
二者均可用于判断是否已进行宏定义,区别之处在于后者更适用于多重判别条件的情形。
如: #if defined(UNIX) && !defined(AIX)
参考文献:
3.3 getopt_long函数
除getopt()提供的短选项(short options, 比如-s)解析外,还提供长选项(long options,比如–name)解析,参数原型为:1
2
3
4
5
6
7
8 #include <unistd.h>
int getopt(int argc, char * const argv[],
const char *optstring);
extern char *optarg;
#include <getopt.h>
int getopt_long(int argc, char * const argv[],
const char *optstring,
const struct option *longopts, int *longindex);
详见:man getopt_long1
2
3
4
5
6
7
8getopt_long() and getopt_long_only()
The getopt_long() function works like getopt() except that it also
accepts long options, started with two dashes. (If the program accepts
only long options, then optstring should be specified as an empty
string (""), not NULL.) Long option names may be abbreviated if the
abbreviation is unique or is an exact match for some defined option. A
long option may take a parameter, of the form --arg=param or --arg
param.
参考:
注意:注意的是默认情况下getopt会重新排列命令行参数的顺序,所以到最后所有不包含选项的命令行参数都排到最后(参考阅读)。
几个重要全局变量:
optarg:处理带输入参数的选项时,选项参数保存至char *optarg中。
optind:下一个处理的选项在argv中的地址,所有选项处理完后,optind指向未识别的项。
optopt:最后一个已知项。
- 该函数的实现是如何做的?
答:getopt()的GNU实现,getopt_long()的NetBSD实现 ,一种getopt_long()的简单实现。 - 当短参数作为输入时,该函数如何返回?
答:getopt_long()是同时支持长选项和短选项的getopt()实现。
4. build_request构建HTTP Request请求报文
HTTP request HEADER实例:1
2
3
4
5
6
7
8GET / HTTP/1.1
Host: www.baidu.com
Connection: keep-alive
Accept: text/html,application/xhtml+xml,application/xml;q=0.9,image/webp,*/*;q=0.8
User-Agent: Mozilla/5.0 (Windows NT 10.0; WOW64) AppleWebKit/537.36 (KHTML, like Gecko) Chrome/38.0.2125.122 Safari/537.36 SE 2.X MetaSr 1.0
Accept-Encoding: gzip,deflate,sdch
Accept-Language: zh-CN,zh;q=0.8
Cookie: BAIDUID=F15E01110B326AD842971F8F6940A792:FG=1; BIDUPSID=63FD0CC5131605458B03706A38CF7B77; PSTM=1454512482; BDUSS=UlRMzJIaTQxRWpNODZ6QWVaaTd5T0ZLRUFENE9lWnE5SmpUMTA4VTd6U2RnLUZXQVFBQUFBJCQAAAAAAAAAAAEAAADl32Eqc2hhcmU0bWluZQAAAAAAAAAAAAAAAAAAAAAAAAAAAAAAAAAAAAAAAAAAAAAAAAAAAAAAAAAAAAAAAAAAAAAAAJ32uVad9rlWN; pgv_pvi=4551769088; pgv_si=s5801567232; BD_HOME=1; BDRCVFR[x4e6higC8W6]=mk3SLVN4HKm; BD_CK_SAM=1; H_PS_PSSID=18285_1447_18281_15881_12171_19463; B64_BOT=1; BD_UPN=19314753; H_PS_645EC=500cYxxldUv%2Fv3Bka0tftuXyc37e8YB1%2BM9ctwCFeZ8CiNLplWVkf7iAt7qRW46Aq5I; sug=3; sugstore=0; ORIGIN=2; bdime=20100
4.1 Pragma: no-cache
HTTP/1.0+以上支持无缓存的报文头部声明,header(头域)中缓存设置的详解(关于Cache-control和Pragma)
开启force_reload且设置代理服务器的情况下,才设置Pragma: no-cache
4.2 Connection: close
http/1.0+以上版本,添加Connection: close表示连接为短连接,一次连接即时关闭。
关于设置http响应头connection的作用
4.3 Difference HTTP1.0/1.1/0.9
HTTP/0.9 HTTP/1.0 HTTP/1.1三个版本的HTTP协议对比:
一,HTTP协议最初开始的设计目标就是通过网络来支持Client和Server之间的事务处理。为了适应WWW的需求,在功能和性能方面进行了大量的改进,最开始出现的HTTP原始协议现在称为HTTP0.9,它是一个面向消息的简单协议,是现在使用的HTTP协议的子集。因此它同 HTTP1.0,HTTP1.1兼容。该协议描述了Client和Server之间请求和响应的过程:Client在本地主机向运行于远程主机上的 Server请求链接,连接成功之后通过GET来访问Server端对象(可以是普通网页,也可以是通过CGI或ISAPI生成的动态页面),Server端在连接终止之前将请求的对象或者是错误消息返回给Client,结束响应过程HTTP0.9和现在使用的HTTP1.1在基本上实现上没有大的区别。
二,HTTP1.0是以HTTP0.9为基础发展起来的,增加了复杂网络连接下访问不同对象类型的功能,基本的改进如下:请求的类型,如 HEAD、POST等。请求和响应消息的协议版本,响应消息第一行以“HTTP/1.0”开始,表示Server使用的是HTTP协议的1.0版。使用 Server响应码来表示请求响应消息的成功与否,如果响应消息第一行以“200 OK”结束,说明操作成功。使用MIME的消息标题(Header)和消息体(Body)格式来描述访问对象的数据类型和附加在后面的元信息,如MIME的Header为“Content-type:text/html”表明响应的消息实体是HTML文件,增加了MIME支持之后,使HTTP协议扩大了处理的数据类型,支持对多媒体流信息的处理。用 Challenge/Response实现认证,这样可以在用户访问某些页面时要求输入用户名和密码,进行身份认证。增加了代理(proxy)支持功能,在HTTP0.9中,规定了Client和Server只能直接交互,而1.0版可以通过代理等中间实体实现间接连接。
三,HTTP1.1是在HTTP1.0的基础上实现的一次飞跃,主要的改进集中在性能、安全、数据类型处理等方面:提出Server端缓冲对象的概念,是减少网络上相同类型内容的反复传送,提高访问速度。基本的连接是永久连接,提高了性能。允许Client和Server之间对内容进行协商突破了HTTP1.0中Server和IP一一对应的限制,可能通过主机名来决定由哪一个Server提供服务。
四,HTTPng是发展中的下一代协议,在效率和性能上将有了更进一步的提高…
<string.h>常用字符串处理函数
1 | atoi: string转换为int |
5. bench函数部分
5.1 proxyhost和proxyport识别
-p proxyhost:proxyport:
巧妙利用C语言字符处理的特点,proxyhost=proxyhost:proxyport, 先定位:位置为tmp,再将:修改为’\0’(*tmp='\0'),则proxyhost=proxyhost, proxyport=atoi(tmp+1)
利用字符串特性,实现代理服务器域名和端口号的分割,最初忽略了*tmp='\0'导致一直好奇如何做到这点的。
5.2 pipe 管道
pipe管道, 函数原型int pipe(int fd[2])
pipe是进程通信的一种方式,一个进程向管道中写入数据,管道另一端的另一个进程读出数据。
管道是半双工的,数据单向流动,如果要求双向通信,则需建立两个管道。
管道基本使用方法:
进程A写管道pipe[0]<------>进程B读管道pipe[1]1
2
3
4
5
6
7
8
9
10
11
12
13
14
15
16
17
18
19
20
21
22
23
24
25
26
27
28
29
30
31
32int mypipe[2];
if(pipe(mypipe))
{
perror("pipe failed.");
return 3;
}
pid=fork();//creating sub_process
if(pid== (pid_t) 0) //sub_process
{
benchcore(host,proxyport,request);
f=fdopen(mypipe[1],"w");
if(f==NULL)
{
perror("open pipe for writing failed.");
return 3;
}
fprintf(f,"%d %d %d\n",speed,failed,bytes);
fclose(f);
} else //main process
{
f=fdopen(mypipe[0],"r");
setvbuf(f,NULL,_IONBF,0);
while(1){
pid=fscanf(f,"%d %d %d",&i,&j,&k);
speed+=i;
failed+=j;
bytes+=k;
if(--clients==0) break;
}
fclose(f);
}
5.3 fork 多进程
1 | #include <unistd.h> |
pid_t pid = fork():fork()返回值的差异
pid < 0 : 进程创建失败,返回负值
pid = 0: 在子进程中,fork()返回值为0
pid > 0: 父进程中,fork()返回子进程的进程ID
参考阅读
6. benchcore函数部分
6.1 proxyhost VS host是否设置代理请求
是否配置代理,主要区别在benchcore函数调用时:1
2
3
4if(proxyhost==NULL)
benchcore(host,proxyport,request);
else
benchcore(proxyhost,proxyport,request);
./webbench -p 123.123.123.123:8080 http://www.baidu.com/, 其中host=www.baidu.com, proxyhost=123.123.123.123 proxyport=8080, 默认proxyport=80
当不配置代理时,proxyport是host的端口
当配置代理时,proxyport是代理服务器的端口
6.2 goto语句
nexttry部分: goto 语句标号,在多层嵌套循环结构中为了准确定位控制,使用了goto的语句。
加入goto的作用在于该段代码中存在两层的while(1)循环,一个为不断进行请求,一个为不断获取返回数据。
并不能把goto妖魔化,此处能简洁的控制程序,就是个不错的例子。
6.3 信号处理
1 | struct sigaction sa; |
sigaction: signal函数相同功能,但signal不是POSIX标准,而sigaction是POSIX标准定义的信号处理函数
声明了信号和响应处理函数的关联关系, 这里采用SIGALRM信号来实现控制任务执行时间的作用。
该过程在信号处理函数中对变量timerexpired操作,以期记录时间耗尽达到控制程序结束的目的。1
2
3
4
5
6
7
8
9
10
11
12
13
14
15
16
17#include <signal.h>
int sigaction(int signum, const struct sigaction *act, struct sigaction *oldact);
* signum:要操作的信号。
* act:要设置的对信号的新处理方式。
* oldact:原来对信号的处理方式。
* 返回值:0 表示成功,-1 表示有错误发生。
struct sigaction 类型用来描述对信号的处理,定义如下:
struct sigaction
{
void (*sa_handler)(int);
void (*sa_sigaction)(int, siginfo_t *, void *);
sigset_t sa_mask;
int sa_flags;
void (*sa_restorer)(void);
};
参考阅读:Linux 进程学习(四)—— sigaction 函数
6.4 Socket
Socket的读写操作时Linux网络编程的基础,之前做过类似的例子。
Webbench中利用socket.c中将Socket进行了封装,函数原型int Socket(const char *host, int clientPort)
该函数中对Socket操作进行了封装,实现对指定host、端口port的Socket连接。if(rlen!=write(s,req,rlen)) {failed++;close(s);continue;: 将request写入socketi=read(s,buf,1500): 读取socket的1500字节到buf中,该过程为循环调用,直到返回值为0时表示读取结束。
总结
- WebBench作者对HTTP不同版本的熟悉,令人佩服,细节处理很周到。
- 程序的逻辑控制、函数划分,合理高效,一个函数完成一个功能,耦合性低。
- 做好基本的功能,不造重复的车轮,作者很好的实现了
单一却迫切需求的功能,使得webbench准确满足特定需求。
项目源码及注释:GitHub:Fivezh/WebBench